Term 2 Projects
Caculator Design Challenge

This assignment for this project was to replicate your calculator. Before I could begin I needed to know how to use the text tools, hatch tools, the fillet tool, trim tool, line, arc, circle, copy, and move tools. First I measured the height and width of this calculator and created the structure of the calculator. Then I added the arc to the bottom and the two pieces that are added to the side. Next I created one row of butons and copied it four times. I then created the next section of buttons making sure I measured each and had correct spacing. I then added the screen. Once all the buttons were complete I added the text and the numbers to every button. I then used colored text to add the words above and below the buttons. Next I hatched all the buttons and the screens that needed color. My final product was a great replica of my own calculator because everything was in proportion. During this project I got feedback from my classmates on how to scale certain aspects of my calculator. After the project we peer graded, which was another opportunity for me to recieve feedback. In this assignment I learned how to use colored text. If I was to redo this project I would add more hatching to the background to better replicate my calculator.
My Traffic Signs
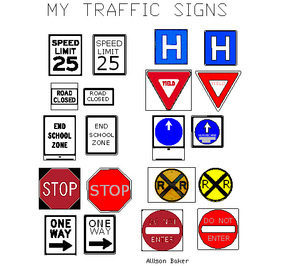
In this project we had to replicate 10 traffic signs of our choice, as long as one of them was a stop sign. When looking at my project there are 2 copies of each sign. One sign is the one that I made and the other is the one I got off the internet. The left hand copy of the sign is the one off the internet and the right hand copy is the one I created in CADD. The first step in this project was I had to collect the pictures of 10 different examples of signs and copyed them into CADD. Next I designed the first sign by using the shape and line tools. To create certain aspects I copied directly over the original sign. I repeated this process for the next 9 signs. This project took three classes to complete. My final product is very similar to the actually designs except for some of the colors and fonts. During this project I recieved feedback from my peers that sit around me. They showed me how to hatch certain areas of the signs. During this project I learned that you can make almost anything in CADD class. If I was to redo this project in the future I would try to make the fonts closer to the actual fonts of the signs and then I would fix the Hurricane Evactuation Route sign becuase it did not hatch correctly.
Craze Maze
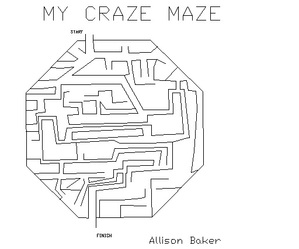
The challenge for the craze maze project was to create a maze on the CADD software. We were to use all of the different tools we had learned so far. The first step to this project was to create a border for the maze. Next I created the start and finish of the maze. Then I created the different possible paths. The final product was an incredibly difficult maze that was hard to complete. During this project I did not recieve any feedback becuase it was an individual project that had no true specifications. If I did this again I would use diffeent lines.
Isometric Designs
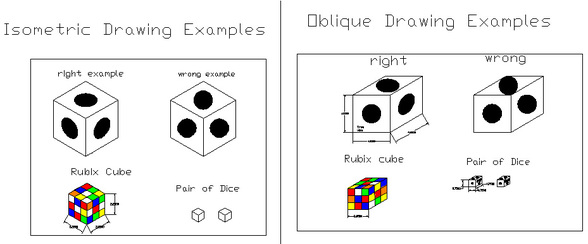
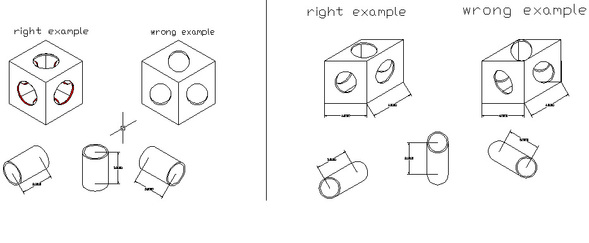
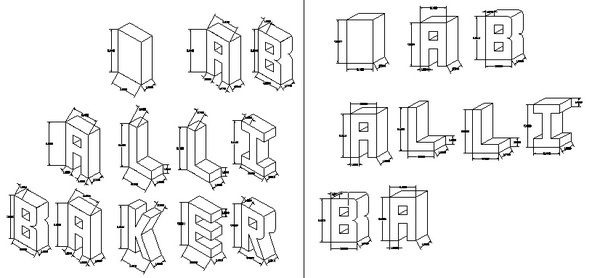
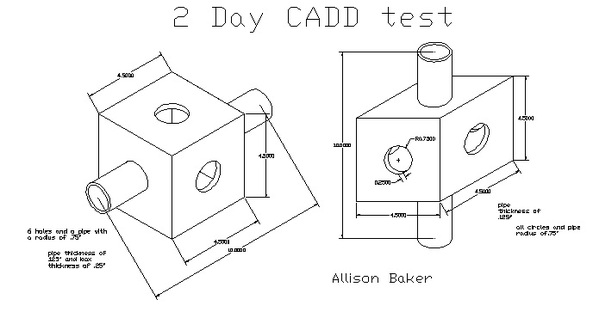
This project was a four part project. First Mr. Ramos introduced us to creting oblique and isometric drawings. He taught us how to make boxes and then we created a Rubix cube and a pair of dice. Next Mr. Ramos had us create our own boxes. To do this we had to set our grids to Isometric grids and had to remeber to disingusih between the oblique bow and the Isometric box. During this project I learned how to create isometric circles, not just regular circles. In the next class Mr. Ramos showed us how to create Isometric and oblique pipes. We then created our own. For this part we had to know how to create lines that were tangent to the circles and we needed to delete the lines that were not visible. For the third part of the project Mr. Ramos first had us create our initials and then he had us create our name. During this project I learned how to make sure that all visible lines were dipicted in my drawing. The final part of this project was a 2 Day CADD Test. For this project Mr. Ramos had us create two boxes, one oblique and one isometric, that both had a pipe coming through each. In this project we had to use all our tools that we had learned in term one and two. My final product of the whole isometric/ oblique unit, I was very satisfied with. During this four part project I recieved feedback from my peers and Mr. Ramos at different parts of the project. If I was to do this project again, I would go back and finish my oblique name.
